Sealing your garage door is essential for maintaining a comfortable and secure space. Imagine walking into your garage and feeling a chilly draft or finding unwanted pests – not ideal! Properly sealed garage doors help prevent drafts, keep out pests, and reduce energy costs by improving insulation. This simple task can make a big difference in your garage’s environment.
Consider those high energy bills, especially during extreme weather. By sealing your garage door, you create a barrier that keeps outside elements from affecting your indoor space, ultimately saving you money on heating and cooling. A well-sealed garage door can also protect your stored items from moisture and temperature fluctuations, prolonging their lifespan.
In this guide, we’ll walk you through sealing your garage door at the bottom, sides, and top, ensuring a tight and effective seal. Visit Lopez Garage Door and Opener for more expert tips and services.
Understanding Garage Door Sealing
Before diving into the specific sealing methods, it’s important to understand why sealing your garage door is necessary. A well-sealed garage door prevents unwanted air exchange, protects against moisture damage, and keeps out insects and rodents. This not only improves the overall energy efficiency of your home but also maintains a cleaner and more comfortable garage environment.
Sealing a Garage Door at the Bottom
The bottom of your garage door is a common entry point for drafts and pests. Sealing this area can help improve energy efficiency and keep unwanted critters out. Here are the step-by-step procedures for the two primary methods to seal this area:
Method 1: Installing Garage Floor Seals
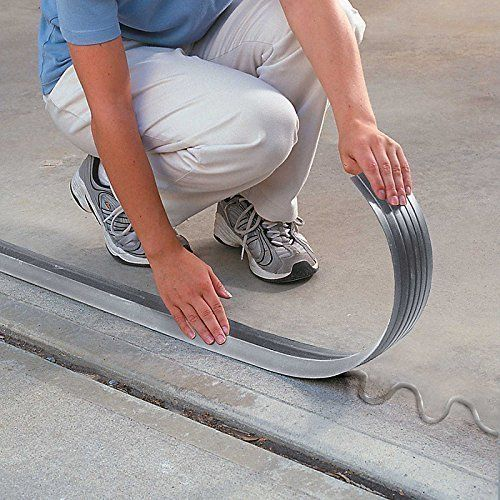
Garage floor seals are installed directly onto the floor where the garage door meets the ground. These seals are typically made from durable rubber or vinyl and provide a sturdy barrier against external elements. They are ideal for garages with uneven floors as they help to fill gaps and create a tight seal.
Materials Needed:
- Garage floor seal
- Measuring tape
- Utility knife or heavy-duty scissors
- Adhesive (if required by the product)
- Clean cloth
- Marker or chalk
Step-by-Step Procedure:
- Measure the Garage Door Width: Use a measuring tape to determine the width of your new garage door. This will help you cut the garage floor seal to the correct length.
- Cut the Floor Seal: Using a utility knife or heavy-duty scissors cut the garage floor seal to match the width of your garage door.
- Clean the Installation Area: Thoroughly clean the area where the seal will be installed. Remove any dirt, dust, or debris to ensure the adhesive bonds well.
- Mark the Placement: Use a marker or chalk to mark the exact placement of the floor seal along the garage floor.
- Apply Adhesive (if required): Some garage floor seals come with adhesive strips, while others may require you to apply adhesive separately. Follow the instructions provided by the manufacturer in applying the adhesive.
- Install the Floor Seal: Place the floor seal along the marked line on the garage floor. Press down to ensure it sticks as needed.
- Check the Seal: Close the garage door to check for any gaps and ensure that the seal is making proper contact with the bottom of the door.
Method 2: Installing Garage Door Bottom Seals
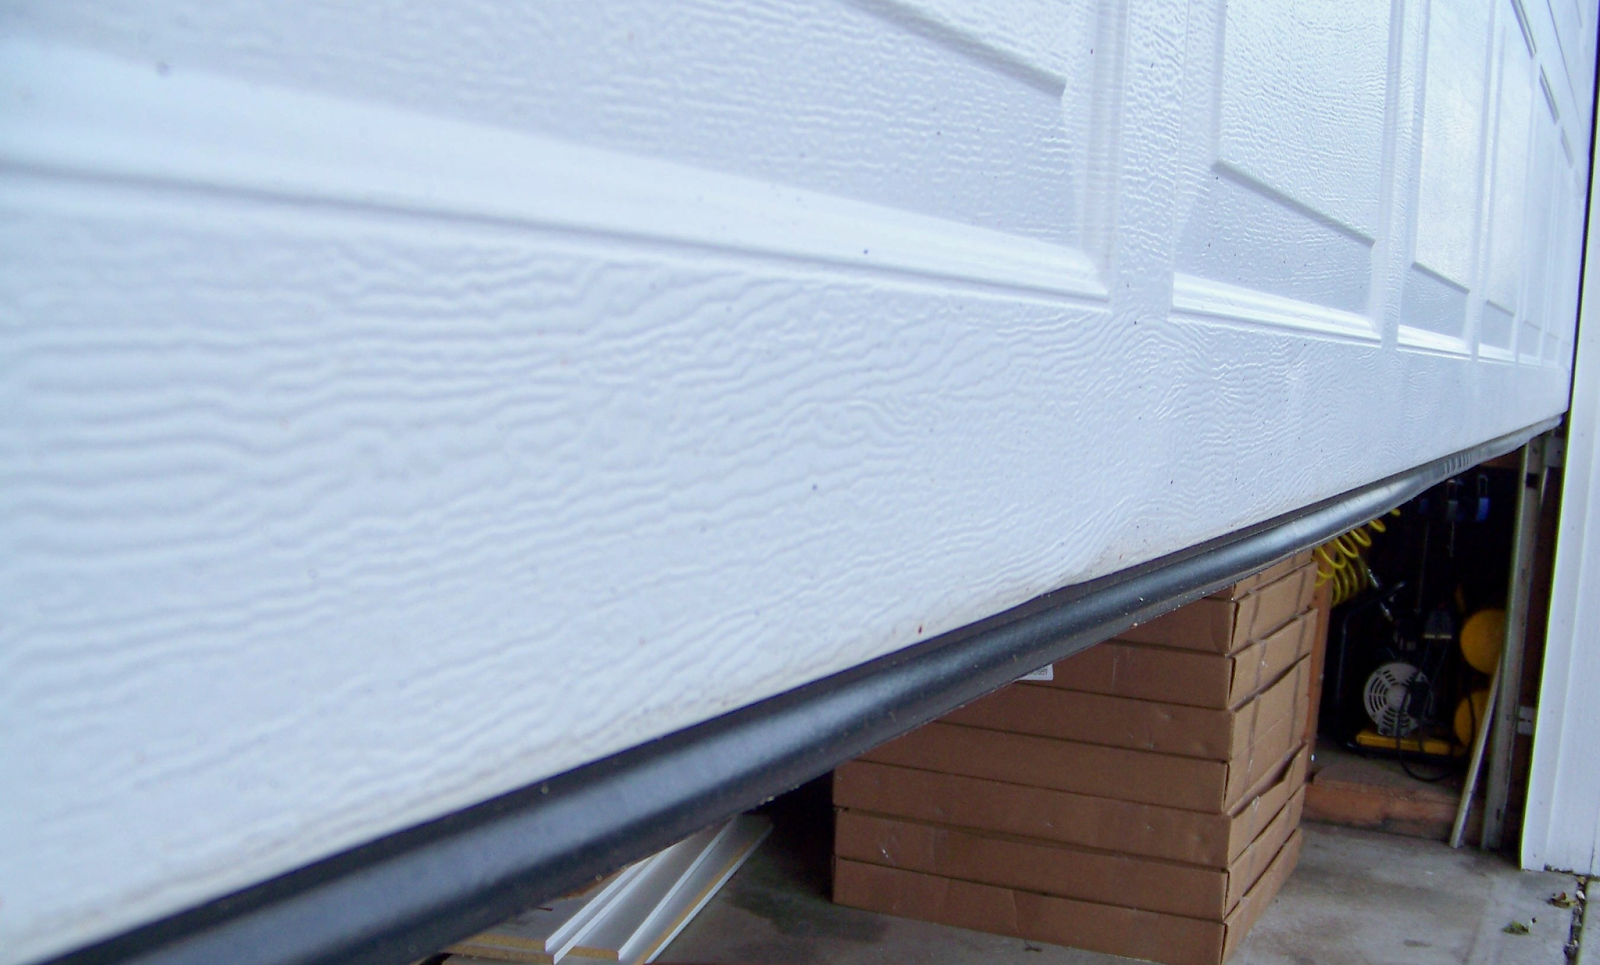
Garage door bottom seals attach to the bottom edge of the door itself. These seals come in various types, including T-shaped, U-shaped, and bulb seals, each designed to fit different garage door configurations. Bottom seals are easy to install and replace, providing an effective barrier against drafts and pests.
Materials Needed:
- Garage door bottom seal
- Measuring tape
- Utility knife or heavy-duty scissors
- Screwdriver (if required)
- Clean cloth
- Lubricant (if required)
Step-by-Step Procedure:
- Measure the Garage Door Width: Measure the width of your garage door to determine the length of the bottom seal you will need.
- Remove the Old Seal (if applicable): If there is an old seal in place, remove it by sliding it out of the retainer or unscrewing it, depending on the type of seal and retainer used.
- Clean the Retainer: Use a clean cloth to wipe down the retainer where the new seal will be installed. Ensure no dirt or debris could interfere with the new seal.
- Lubricate the Retainer (if required): Some retainers may need a light application of lubricant to help the new seal slide in more easily.
- Cut the New Seal: Using a utility knife or heavy-duty scissors, cut the new bottom seal to match the width of your garage door.
- Install the New Seal: Insert one end of the seal into the retainer and slide it across the length of the door. Make sure the seal is evenly distributed and properly aligned.
- Secure the Seal (if required): If your seal requires screws or other fasteners, use a screwdriver to secure the seal in place according to the manufacturer’s instructions.
- Check the Seal: Close the garage door and inspect the bottom edge to ensure there are no gaps and the seal is making proper contact with the floor.
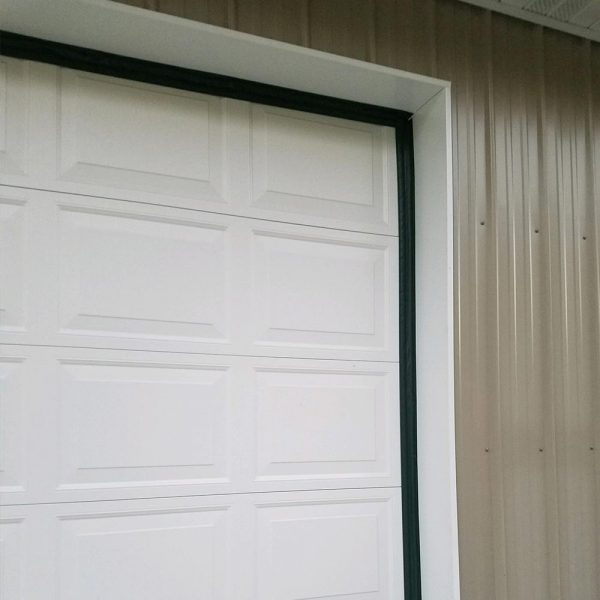
Sealing the Sides of a Garage Door
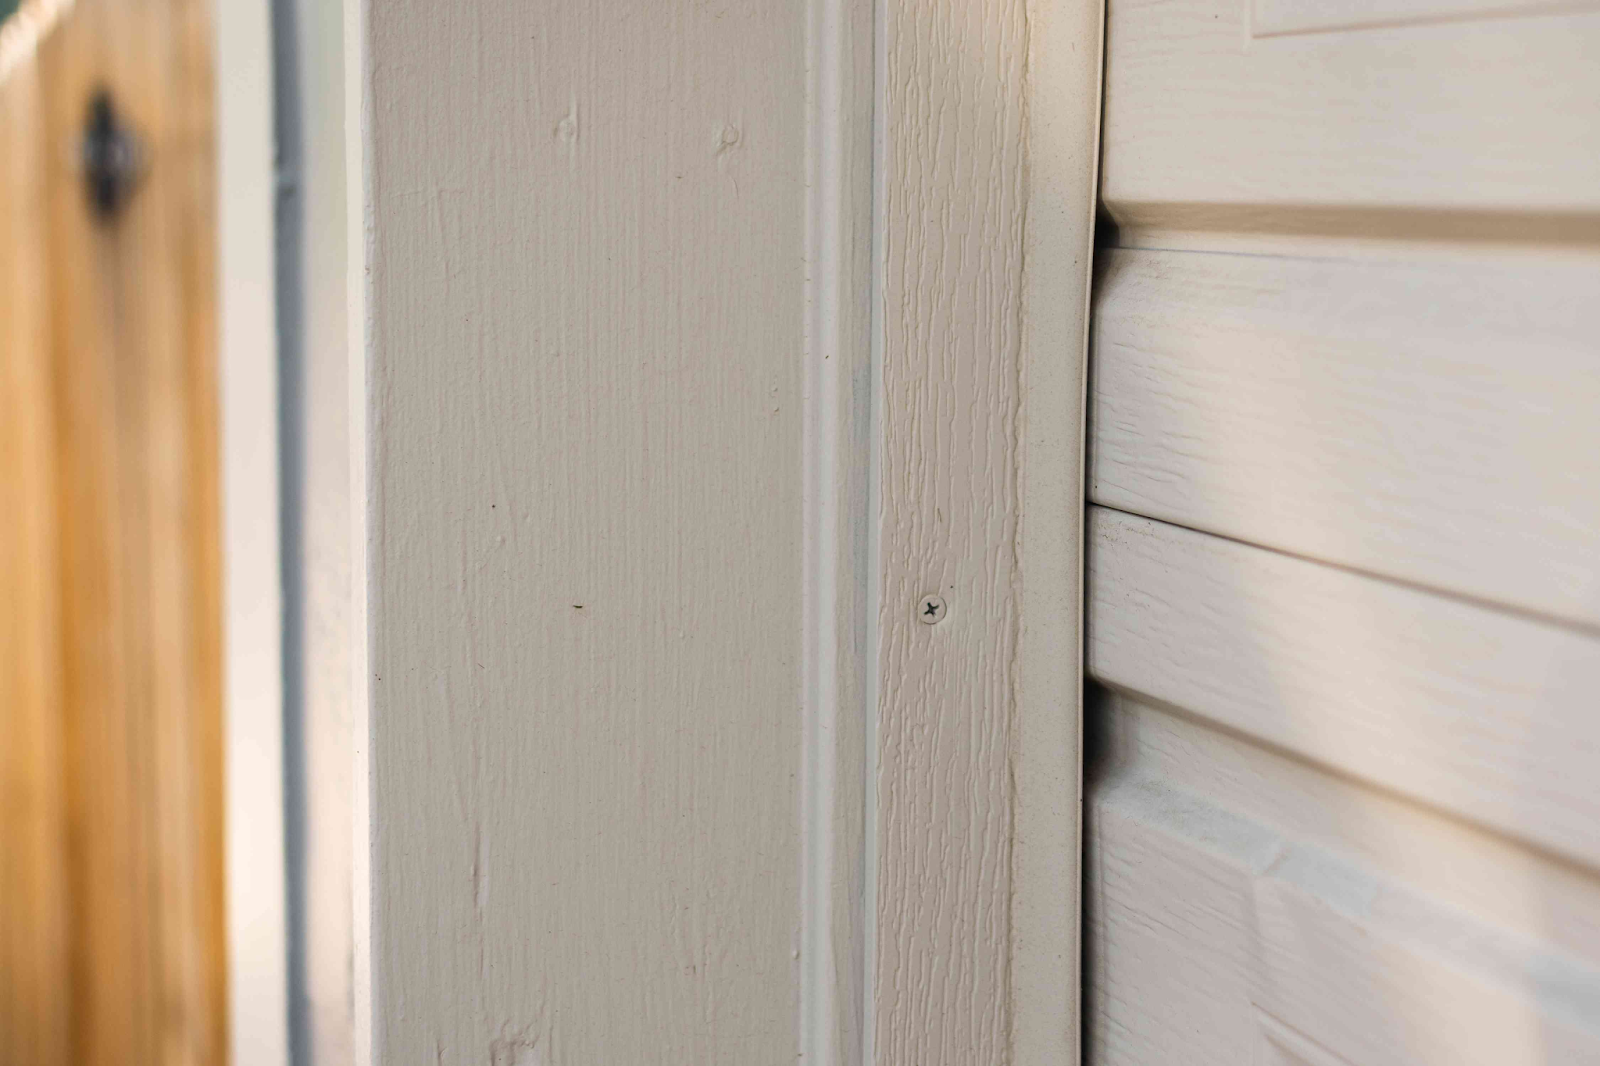
Sealing the sides of your garage door involves installing weatherstripping along the vertical edges. Weatherstripping materials such as foam, rubber, or vinyl are commonly used. These strips compress when the door is closed, filling gaps and preventing air leakage. Regularly inspect and replace weatherstripping to maintain an effective seal.
Step-by-Step Procedure:
- Gather Materials and Tools:
- Weatherstripping (foam, rubber, or vinyl)
- Measuring tape
- Scissors or utility knife
- Cleaning supplies (soap, water, cloth)
- Adhesive (if required by weatherstripping type)
- Nails or screws (if required by weatherstripping type)
- Hammer or screwdriver
- Weatherstripping (foam, rubber, or vinyl)
- Measure the Door:
- Measure the height of both vertical sides of the garage door frame using a measuring tape.
- Cut the weatherstripping to match these measurements.
- Measure the height of both vertical sides of the garage door frame using a measuring tape.
- Clean the Surface:
- Clean the vertical edges of the garage door frame with soap and water.
- Ensure the surface is dry and free of dirt or debris.
- Clean the vertical edges of the garage door frame with soap and water.
- Apply Weatherstripping:
- Depending on the type of weatherstripping, peel off the adhesive backing or prepare nails/screws for attachment.
- Starting at the top, carefully align the weatherstripping with the edge of the door frame.
- Press firmly to ensure a good seal or use nails/screws to secure it in place.
- Depending on the type of weatherstripping, peel off the adhesive backing or prepare nails/screws for attachment.
- Check the Seal:
- Close the garage door to ensure the weatherstripping compresses properly and seals the gaps.
- Perform needed adjustments to ensure a snug fit.
- Close the garage door to ensure the weatherstripping compresses properly and seals the gaps.
- Regular Maintenance:
- Periodically inspect the weatherstripping for wear and tear.
- Replace the weatherstripping if it becomes damaged or ineffective.
- Periodically inspect the weatherstripping for wear and tear.
Sealing the Top of a Garage Door

The top of the garage door should also be sealed to prevent heat loss and drafts. Similar to the sides, weatherstripping or a top seal can be applied along the upper edge of the door. Ensure that the material used is compatible with your door type and provides a snug fit when the door is closed.
Step-by-Step Procedure:
- Gather Materials and Tools:
- Weatherstripping or top seal
- Measuring tape
- Scissors or utility knife
- Cleaning supplies (soap, water, cloth)
- Adhesive (if required by weatherstripping type)
- Nails or screws (if required by weatherstripping type)
- Hammer or screwdriver
- Weatherstripping or top seal
- Measure the Door:
- Measure the width of the top edge of the garage door frame using a measuring tape.
- Cut the weatherstripping or top seal to match this measurement.
- Measure the width of the top edge of the garage door frame using a measuring tape.
- Clean the Surface:
- Clean the top edge of the garage door frame with soap and water.
- Ensure the surface is dry and free of dirt or debris.
- Clean the top edge of the garage door frame with soap and water.
- Apply Weatherstripping or Top Seal:
- Depending on the type of weatherstripping, peel off the adhesive backing or prepare nails/screws for attachment.
- Starting at one end, carefully align the weatherstripping with the edge of the door frame.
- Press firmly to ensure a good seal or use nails/screws to secure it in place.
- Depending on the type of weatherstripping, peel off the adhesive backing or prepare nails/screws for attachment.
- Check the Seal:
- Close the garage door to ensure the weatherstripping compresses properly and seals the gaps.
- Check for necessary adjustments to ensure a perfect fit.
- Close the garage door to ensure the weatherstripping compresses properly and seals the gaps.
- Regular Maintenance:
- Periodically inspect the weatherstripping for wear and tear.
- Replace the weatherstripping if it becomes damaged or ineffective.
- Periodically inspect the weatherstripping for wear and tear.
Why Sealing Your Garage Doors Is Important
Sealing your garage doors offers several key benefits that enhance the functionality and security of your home:
- Energy Efficiency and Cost Savings: Helps maintain a consistent temperature inside the garage and reduces heating and cooling costs by preventing drafts and minimizing heat transfer.
- Protection from Moisture and Pests: Prevents water damage and rust by keeping out rain and humidity, and blocks entry points for insects and rodents, protecting your belongings.
- Enhanced Security: Eliminates gaps that intruders could exploit, increasing home security, and strengthening the door, making it more resistant to forced entry.
- Noise Reduction: Reduces outside noise, creating a quieter space, and minimizes noise from the door opening and closing.
- Improved Comfort and Usability: This makes the garage more comfortable for various activities in any season and ensures the door operates smoothly and looks well-maintained.
FAQs on Sealing Garage Doors
How often should I replace garage door seals?
Garage door seals should be inspected annually and replaced every 1-2 years, or as soon as they show signs of wear and tear such as cracks, brittleness, or gaps. Regular maintenance ensures your garage stays well-insulated and protected from pests, moisture, and drafts. If you notice any visible damage or experience issues with temperature control, it’s a good idea to replace the seals sooner to maintain the efficiency of your garage. Additionally, consider scheduling a garage door repair to address any other potential issues.
Can I install garage door seals myself?
Yes, many garage door seals are designed for easy DIY installation. However, for best results and longevity, ensure you follow the manufacturer’s instructions carefully. Most installations require basic tools and some handyman skills. If you’re comfortable with DIY projects, you can save money by installing the seals yourself. However, if you prefer a professional touch or have a complex setup, hiring an expert can ensure the job is done correctly.
What types of seals are best for uneven garage floors?
Garage floor seals made from flexible materials like rubber are best for uneven floors as they can conform to the surface and fill gaps effectively. These seals can adapt to irregularities in the floor, providing a tight seal that blocks out drafts, debris, and pests. Look for seals specifically designed for uneven surfaces to ensure they provide the best fit and performance for your garage.
How do I know if my garage door is properly sealed?
Check for drafts by running your hand along the edges of the door on a windy day. Also, look for signs of light coming through gaps around the door. A properly sealed garage door should prevent air, light, and moisture from entering. Additionally, you can use a smoke pencil or incense stick to detect air leaks. If you find any gaps or feel drafts, it’s time to adjust or replace your seals to maintain optimal insulation.
What tools do I need to install garage door seals?
Common tools needed include a tape measure, utility knife, screwdriver, adhesive, and a drill with appropriate bits. Specific tools may vary based on the type of seal being installed. Ensure you have all the necessary equipment before starting the project to streamline the process. Following the manufacturer’s instructions will guide you through the specific steps and tools required for your particular seal, ensuring a secure and effective installation.
End Note
Properly sealing your garage door is a simple yet effective way to enhance energy efficiency, keep pests out, and maintain a comfortable garage environment. Regular inspection and maintenance of seals are essential to ensure their effectiveness over time.
If you encounter difficulties or uncertainties during the installation process, consider consulting a professional for assistance. Visit Lopez Garage Door and Opener for expert advice and services.
By investing in quality seals and maintaining them, you can enjoy a well-protected and efficient garage space for years to come. Check out our Quality Services page for comprehensive solutions tailored to your needs.