Garage door sensors are a must for the safe and efficient operation of garage doors. These sensors prevent accidents by ensuring the door doesn’t close when there’s an obstruction. If your garage door isn’t closing properly, misaligned sensors could be the issue.
In this guide, we’ll walk you through the steps to adjust your garage door sensors, ensuring they function correctly. We’ll cover the tools you’ll need, the process of aligning the sensors, and tips for troubleshooting common issues that might arise. For expert assistance and more detailed information, visit Lopez Garage Door and Opener.
Proper sensor alignment not only enhances safety but also extends the life of your garage door system. By following this guide, you’ll be able to maintain a smoothly operating and reliable garage door. Trust the experts at Lopez Garage Door and Opener for all your garage door needs and to keep your system in top shape.
The Importance of Adjusting Garage Door Sensors
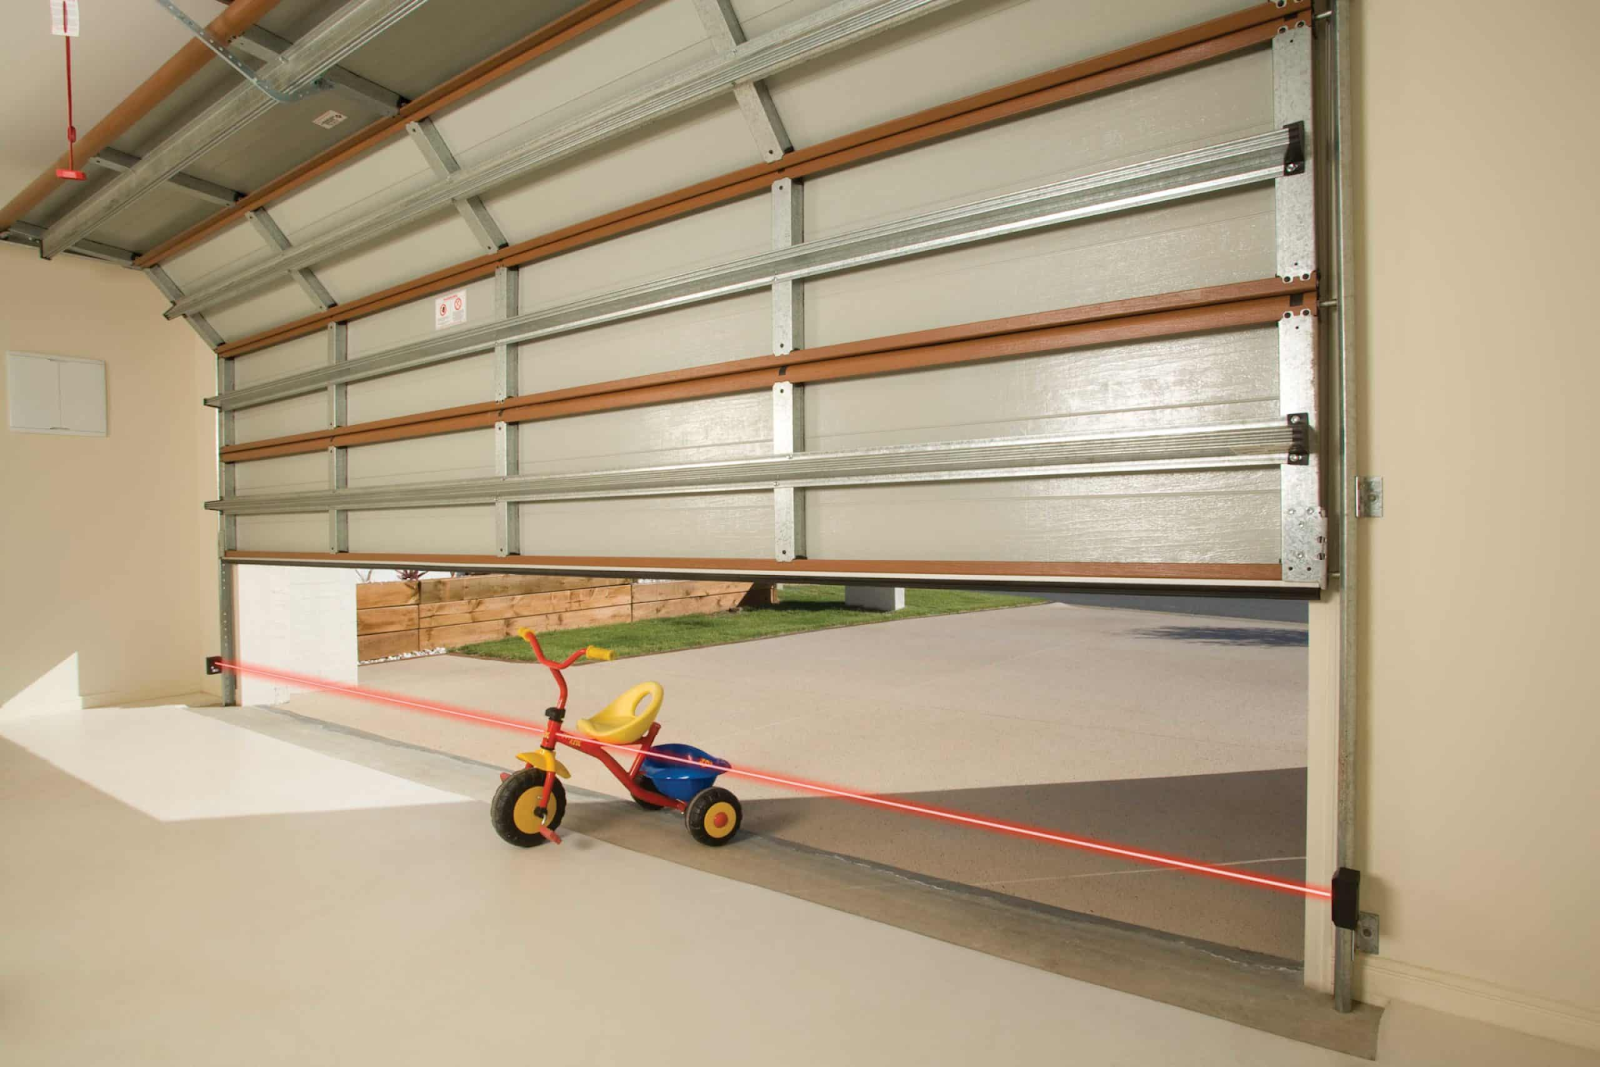
Adjusting garage door sensors is essential for maintaining the safety and functionality of your garage door. Misaligned sensors can cause the door to malfunction, posing a safety hazard and potentially leading to costly repairs. Properly aligned sensors ensure that the door stops and reverses if an obstruction is detected, preventing injuries and damage.
Understanding the Mechanics of Garage Door Sensors
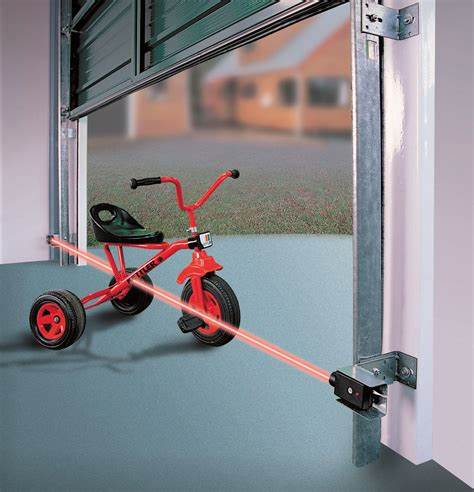
Garage door sensors play a crucial role in the safe operation of your garage door. They function by emitting an infrared beam from one sensor to another. When this beam is uninterrupted, the door operates normally. However, if an object, person, or pet breaks the beam, the sensors signal the garage door opener to stop and reverse the door. This mechanism is designed to prevent accidents and damage to objects or persons in the door’s path. Understanding this basic mechanism is essential for troubleshooting and making necessary adjustments to ensure optimal performance.
Identifying When Your Garage Door Sensors Need Adjustment
Garage door sensors require proper alignment and functionality to ensure the safety and reliability of the garage door system. Here are several signs that your garage door sensors might need adjustment:
- The garage door does not close properly: If your new garage door starts to close but then stops and reverses, it could indicate a problem with the sensors.
- The door reverses immediately after touching the floor: This is a common sign that the sensors are misaligned or obstructed.
- The sensor lights are blinking or not illuminated: The sensors usually have indicator lights that show whether they are aligned correctly. Blinking or unlit lights can signify an issue.
- The door opens but does not close with the remote control: If the garage door opens without any problems but does not close when using the remote control, the sensors might be the culprit.
Detailed Instructions for Adjusting Garage Door Sensors
Adjusting your garage door sensors is a straightforward process that can enhance the safety and efficiency of your garage door system. Follow these steps to ensure proper alignment and functionality:
Step 1: Gather the Necessary Tools and Equipment
- Screwdriver: For adjusting the sensor brackets and securing them in place.
- Level: To ensure the sensors are aligned at the same height.
- Measuring tape: For precise measurements and alignment.
- Cleaning supplies: A soft cloth to clean the sensor lenses.
Step 2: Safety Precautions
- Disconnect the garage door opener: This prevents accidental operation of the door while you’re working on the sensors.
- Inform family members: Let everyone in your household know that you are performing maintenance on the garage door to avoid any interruptions or accidents.
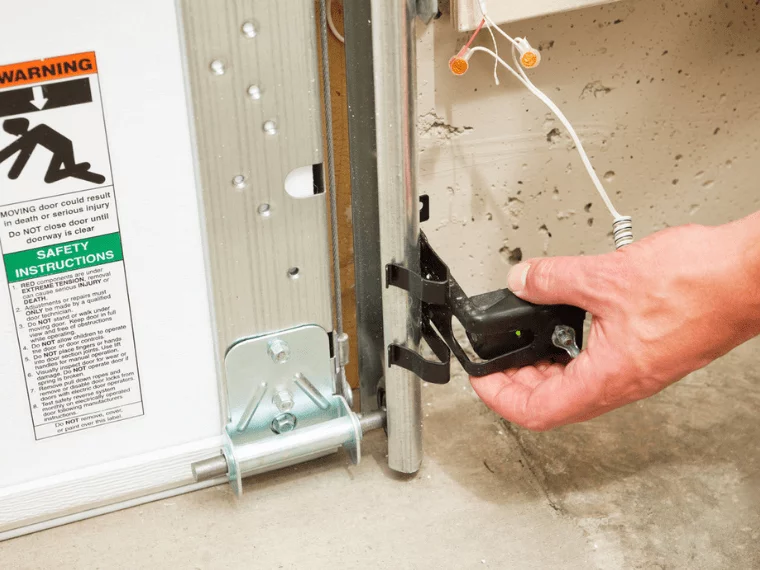
Step 3: Locating and Cleaning the Sensors
- Find the sensors: The sensors are typically located on either side of the garage door, near the floor.
- Clean the lenses: Use a soft cloth to gently clean the lenses of both sensors. Remove anything that may obstruct the infrared beam such as dirt, dust, or debris.
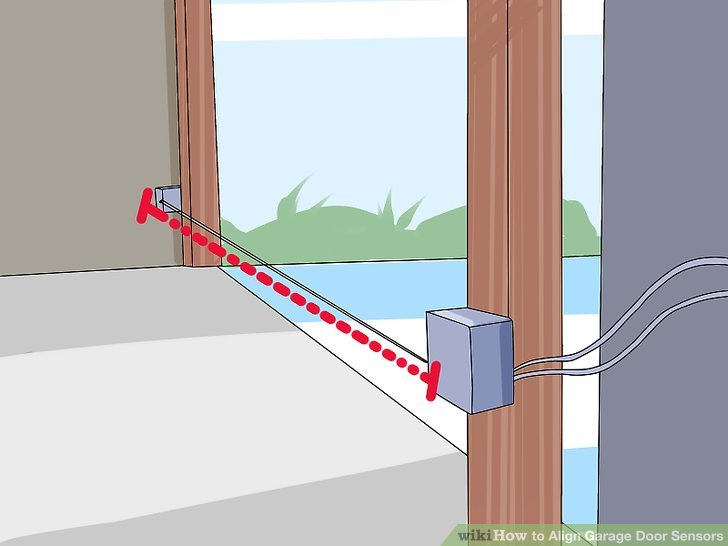
Step 4: Aligning the Sensors
- Use a level: Place the level on top of each sensor to ensure they are positioned at the same height. This is crucial for proper alignment.
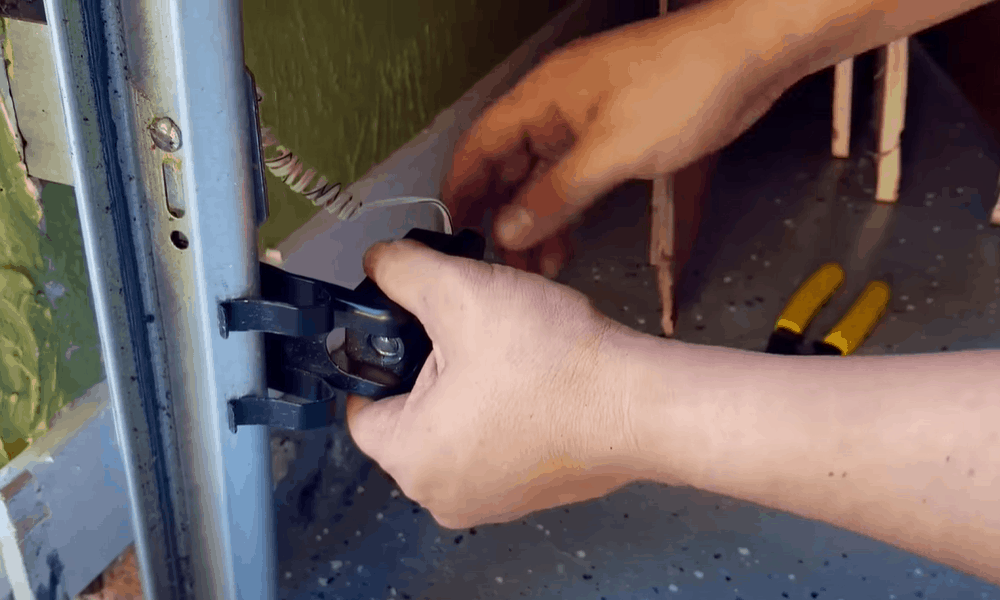
- Adjust the brackets: Loosen the screws on the sensor brackets using the screwdriver. Adjust the sensors so they are in the direction of facing each other directly.
- Tighten the screws: Once the sensors are aligned, tighten the screws to secure the brackets and keep the sensors in place.
Step 5: Testing the Alignment
- Reconnect the garage door opener: After making the adjustments, plug the opener back in or re-engage the power supply.
- Close the door using the remote control: Test the sensors by attempting to close the garage door with the remote control.
- Observe the door’s movement: If the door closes smoothly without reversing, the sensors are properly aligned. If the door reverses or does not close, further adjustments may be necessary. Repeat the alignment process until the sensors are correctly positioned.
Following these detailed instructions will help ensure your garage door sensors are properly aligned and functioning, enhancing the safety and reliability of your garage door system.
Troubleshooting Common Issues with Garage Door Sensor Adjustment
Even with a solid understanding of garage door sensors, you might still face some common issues that require troubleshooting. Here’s a detailed guide to help you address these problems effectively:
- Sensor Lights Not Illuminating:
- Check the Power Supply: Ensure that the sensors are properly connected to a power source. Inspect the power outlet and make sure it’s functioning correctly.
- Examine Wiring Connections: Look for any loose or damaged wires connecting the sensors to the garage door opener. Tighten any loose connections you observe then replace any damaged wires.
- Check the Power Supply: Ensure that the sensors are properly connected to a power source. Inspect the power outlet and make sure it’s functioning correctly.
- Intermittent Operation:
- Secure the Sensors: Make sure the sensors are securely fastened in their brackets. Loose sensors can move out of alignment, causing intermittent operation.
- Remove Obstructions: Ensure no objects are blocking the path between the sensors. Even small obstructions can interfere with the infrared beam.
- Secure the Sensors: Make sure the sensors are securely fastened in their brackets. Loose sensors can move out of alignment, causing intermittent operation.
- False Alarms:
- Clean the Sensor Lenses: Dust, dirt, or spider webs on the sensor lenses can cause false signals. Use a smooth-textured cloth to clean the lenses.
- Check for Reflective Surfaces: Reflective surfaces such as shiny floors or nearby objects can interfere with the sensor beam. Adjust the sensors or cover reflective surfaces to prevent false alarms.
- Clean the Sensor Lenses: Dust, dirt, or spider webs on the sensor lenses can cause false signals. Use a smooth-textured cloth to clean the lenses.
Tools and Equipment for Adjusting Garage Door Sensors
Having the right tools makes the adjustment process easier and more efficient. You will need:
- Screwdriver (Phillips and flat-head)
- Level
- Measuring tape
- Soft cloth for cleaning
- Replacement brackets (if necessary)
Safety Precautions to Consider
When adjusting garage door sensors, safety should be your top priority. Here are key precautions to follow:
- Disconnect the Power: Always disconnect the power to the garage door opener before starting any adjustments to prevent the door from moving unexpectedly.
- Inform Household Members: Let everyone in your household know that you are working on the garage door to avoid accidental operation during maintenance.
- Use Proper Tools: Ensure you have the right tools for the job to avoid accidents or damage.
- Follow Manufacturer’s Instructions: Adhere to the manufacturer’s guidelines for adjusting and troubleshooting the sensors to ensure safety and proper functionality.
- Test Thoroughly: After adjustments, test the garage door system to confirm that it operates correctly and safely.
Ensuring Long-Term Performance of Aligned Garage Door Sensors
Regular maintenance is essential for keeping your garage door sensors aligned and functioning optimally. Periodically check the alignment to ensure the sensors are properly positioned. Clean the lenses regularly to remove dust and debris that could obstruct the infrared beam. Inspect the wiring for any signs of wear or damage, and repair or replace it as needed.
This proactive approach helps prevent future issues, ensures the sensors operate correctly, and prolongs their lifespan. Consistent maintenance not only enhances performance but also contributes to the safety and reliability of your garage door system.
DIY vs. Professional Adjustment: Weighing the Pros and Cons
While adjusting garage door sensors can be a DIY task, there are pros and cons to consider:
- DIY Pros:
- Cost-effective
- Immediate action
- Cost-effective
- DIY Cons:
- Risk of improper adjustment
- Potential safety hazards
- Risk of improper adjustment
- Professional Help Pros:
- Expert knowledge and experience
- Comprehensive inspection and adjustment
- Expert knowledge and experience
- Professional Help Cons:
- Higher cost
- Scheduling delays
- Higher cost
Frequently Asked Questions (FAQs)
How often should garage door sensors be checked?
It’s recommended to check the sensors at least twice a year to ensure they are clean, properly aligned, and functioning correctly. Regular checks can prevent issues like the door from closing or reversing unexpectedly, enhancing the safety and reliability of your garage door system.
What should I do if my garage door sensor light is blinking?
If your garage door sensor light is blinking, clean the sensor lenses and make sure they are properly aligned. Dust, dirt, or misalignment can interfere with the sensors’ operation. Ensure there are no obstructions and the sensors facing each other directly.
Can I use any type of cleaning solution for the sensor lenses?
When cleaning your garage door sensor lenses, use a soft, damp cloth without any harsh chemicals. Harsh cleaners can damage the sensors or leave residues that might impair their function. A gentle wipe with water is usually sufficient to keep them clean and clear.
Why does my garage door reverse immediately after closing?
If your garage door reverses immediately after closing, it typically indicates a sensor alignment issue. The sensors might be detecting an obstruction or are misaligned, causing the door to reverse as a safety measure. Check and adjust the alignment to resolve this problem.
Is professional adjustment worth the cost?
Yes, professional adjustment is worth the cost, especially if you’re unsure about performing the adjustment yourself or if the issue persists. A professional can accurately diagnose and fix the problem, ensuring your garage door operates safely and reliably without causing further damage.
Conclusion
Proper adjustment of garage door sensors is crucial for the safety and functionality of your garage door system. Misaligned or faulty sensors can cause your garage door to malfunction, posing risks to both property and personal safety. By following the steps outlined in this guide, you can ensure your sensors are aligned correctly and troubleshoot common issues effectively. This includes checking the sensor lights, ensuring they are free from obstructions, and adjusting their position as necessary.
Regular maintenance and timely adjustments will help keep your garage door operating smoothly for years to come. Regularly cleaning the sensors and testing their alignment can prevent many common problems before they become serious. Ensuring your garage door sensors work properly not only enhances convenience but also provides peace of mind, knowing your garage door repair is safe and reliable for your family and possessions.
End Note
Maintaining the proper alignment of your garage door sensors is essential for the smooth operation of your garage door and the safety of your household. While this guide provides a comprehensive approach to DIY adjustments, it’s important to recognize when professional assistance is needed. If you encounter persistent issues or if you’re unsure about any step, don’t hesitate to seek help from a qualified technician.
For top-quality garage door services, consider reaching out to Lopez Garage Door and Opener. We offer a range of services, including sensor alignment, repair, and replacement, ensuring your garage door system functions optimally. Located in Katy, TX, they are known for their prompt and reliable service, helping homeowners maintain safe and efficient garage doors.
Regular maintenance, timely adjustments, and professional help when needed will ensure your garage door system remains reliable and safe. By taking these steps, you can extend the lifespan of your garage door and avoid costly repairs in the future. Remember, a well-maintained garage door not only enhances your home’s curb appeal but also adds to its overall safety and security.